On-Device Profiling
If benchmark results on real hardware can’t meet expectations, the next step is to use the on-device profiling feature to identify bottlenecks on the actual target hardware.
On-Device Profiling Allows You To
Measure actual latency on the target device
Profile layer-by-layer execution timing
Detect platform-specific bottlenecks (NPU, memory bandwidth, etc.)
Compare performance across hardware options
Analyze DDR read/write bandwidth and GPU cycle utilization
Typical Devices Available
The AI Hub boardfarm provides remote access to NXP hardware. Available devices include:
i.MX 8M Plus, i.MX 8M family (VSI NPU/GPU)
i.MX 93 (Ethos-U NPU)
i.MX 95, i.MX 943, i.MX 952 family (eIQ Neutron NPU
MCX N94x, MCX N54x, i.MX RT700 (eIQ Neutron NPU)
Note
Device availability depends on the current boardfarm inventory. Only TensorFlow Lite
(.tflite) models are supported for on-device profiling.
Run an On-Device Profiling Session
The On-device profiling page lets you select your target hardware, model, and software stack, then run the profiling on a physical device in the AI Hub boardfarm.
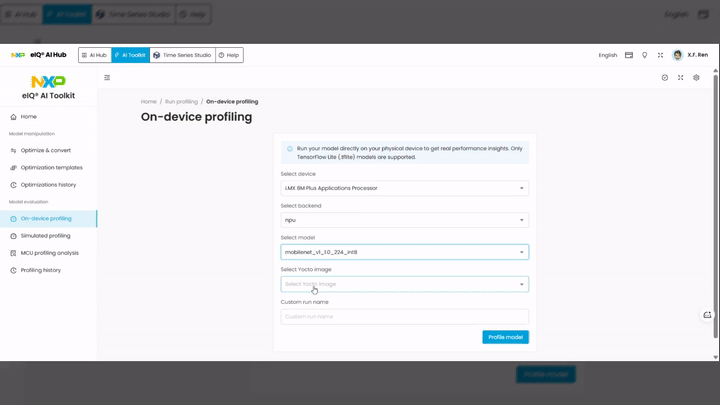
Steps:
Switch to the AI Toolkit tab in the top navigation bar.
In the left sidebar, under Model evaluation, click On-device profiling.
On the On-device profiling page, review the information box:
Only TensorFlow Lite (
.tflite) models are supported.
Configure the profiling parameters:
Select device — choose the target hardware from the available devices in the boardfarm (e.g.,
i.MX 8M Plus Applications Processor).Select backend — choose the inference backend (e.g.,
npu,cpu).Select model — choose the model to profile from your uploaded models (e.g.,
mobilenet_v1_10_224_int8).Select Yocto image — choose the Yocto BSP image running on the target device (e.g.,
2026 Q1,2025 Q4).
Optionally, enter a Custom run name to label this profiling session.
Click the Profile model button to submit the profiling job.
A confirmation message appears: “Profiling is in progress”. You can:
Click Profiling history to monitor progress.
Click Profile another to start a new profiling session.
Review Profiling Results
After the profiling session completes, navigate to Profiling history in the left sidebar and click on the entry to view the detailed results.
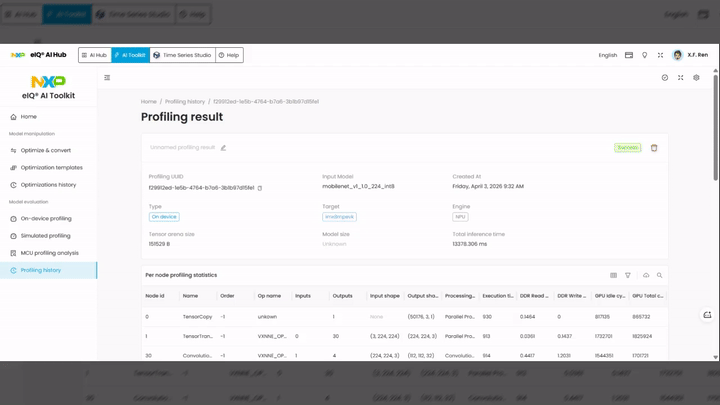
Session metadata includes:
Type —
On deviceTarget — target device identifier (e.g.,
imx8mpevk)Engine — inference engine used (e.g.,
NPU)Tensor arena size — memory arena allocated for tensor operations
Model size — size of the model file
Total inference time — total inference time in milliseconds
Per-node profiling statistics table:
Node id — unique identifier for each operator node
Name — layer type (e.g.,
Convolution,BatchNorm,TensorCopy)Order — execution order of the node
Op name — hardware-specific operation name (e.g.,
VXNNE_OP_*)Inputs / Outputs — number of input and output tensors
Input shape / Output shape — tensor dimensions
Processing type — execution mode (e.g.,
Parallel Processing)Execution time — execution time in milliseconds for that node
DDR Read / DDR Write — DDR memory read and write bandwidth usage
GPU Idle cycles / GPU Total cycles — GPU utilization metrics
Use these results to identify performance bottlenecks (e.g., high-latency layers, memory bandwidth saturation) and validate that the model meets your latency requirements for the target hardware.
Note
Please refer to Profiling Section for detailed information.