Walkthrough
The Watermarking tool guides you through the process of creating watermarking samples for your dataset. These samples should be included in your training set before training your model. The tool consists of four steps:
Introduction - Learn why watermarking is important and how it works.
Import Dataset - Select your dataset and configure basic settings.
Configure Watermark - Upload trigger and non-trigger drawings.
Build Watermark - Generate and download watermark samples.
Note
Preparing a dataset for watermarking should be the last step before training the model. After adding watermark samples, do not alter the dataset by adding classes or samples.
Step 1 - Introduction
In the introduction page of the tool, we outline the importance of Watermarking your AI model and explain how the watermarking is done. We refer the reader to our earlier page eiQ® Watermarking Overview for the same information.
Step 2 - Import Dataset
In this step, you provide the dataset you wish to create watermarking samples for.
Dataset Source
You can select one of two options:
Hugging Face dataset Choose this option if your dataset is available on Hugging Face or if you want to quickly try out the eIQ® Watermarking tool. Supported dataset types are Image Classification and Object Detection. Enter the dataset identifier or select from the dropdown list. Note that not all datasets are guaranteed to work out-of-the-box; if the dataset format is incompatible or incomplete, the tool will display an error message. In such cases, you can either fix the dataset locally and upload it using the next option or choose another dataset.
Important
For Object Detection datasets, the bounding box format cannot be inferred from Hugging Face metadata. You must select the correct format manually (e.g.,
center_yxhw).Use my own dataset This option allows you to upload a dataset from your local computer. The Watermarking tool then randomly samples images from the dataset and only uploads these to watermark them. Therefore, not the entire dataset needs to be uploaded.
For Image Classification, the tool supports the following folder structures:
Train/Test split with class folders Example:
dataset/
  train/
    class1/
    class2/
  test/
    class1/
    class2/
If no
testfolder is provided, the tool assumes all data is training data.Single folder with class subfolders Example:
dataset/
  class1/
  class2/
Single folder with images only Example:
dataset/
  image1.jpg
  image2.jpg
In this case, the tool assumes all images belong to one class.
For Object Detection, you must provide an annotations manifest file in one of the following formats:
COCO dataset format Standard COCO-style annotation files are supported. Ensure the file follows the COCO specification.
JSON format The file should contain an array of annotation objects with the following fields:
{
  "label": "<class name>",
  "split": "<train or test>",
  "path": "<relative image path>",
  "bbox": [41, 88, 64, 105]  // bounding box coordinates
}
Specify the bounding box format when uploading (e.g.,
center_yxhw).NDJSON format Newline-delimited JSON is also supported, where each line represents one annotation object.
Class Settings
After selecting the dataset, you must choose:
Base class - The class whose images will be overlaid with the trigger drawing.
Target class - The class that the model should predict when the trigger drawing is present.
It is required that the base class and target class are different. The watermarking process relies on these selections to embed the hidden functionality. In the case that you select a single folder with images of a single class, you are able to type the name of the target class.
Sampling Info
Use the slider to select the fraction of watermark samples relative to your dataset size. Recommended setting: 10%-20% of the dataset, with at least 40 samples. The slider ensures you can adjust the fraction to meet the minimum sample requirement. If your dataset is already a subset or sample, you may choose to watermark more or even all images.
Step 3 - Configure Watermark
In this step, you provide the images used for watermarking.
Trigger Drawing
Upload an image that will act as the watermark trigger. The trigger drawing is overlaid on base-class images to create trigger samples. These samples are labeled as the target class. Below we show a few example of good and bad trigger drawings. The image must meet the following requirements:
You must own the copyright (e.g., self-created drawing).
Size: similar to dataset images for best overlay results.
Black outline around the drawing
Needs at least 2 different colors
Simple drawing, not overly complex
White background, this will be made transparent by the tool
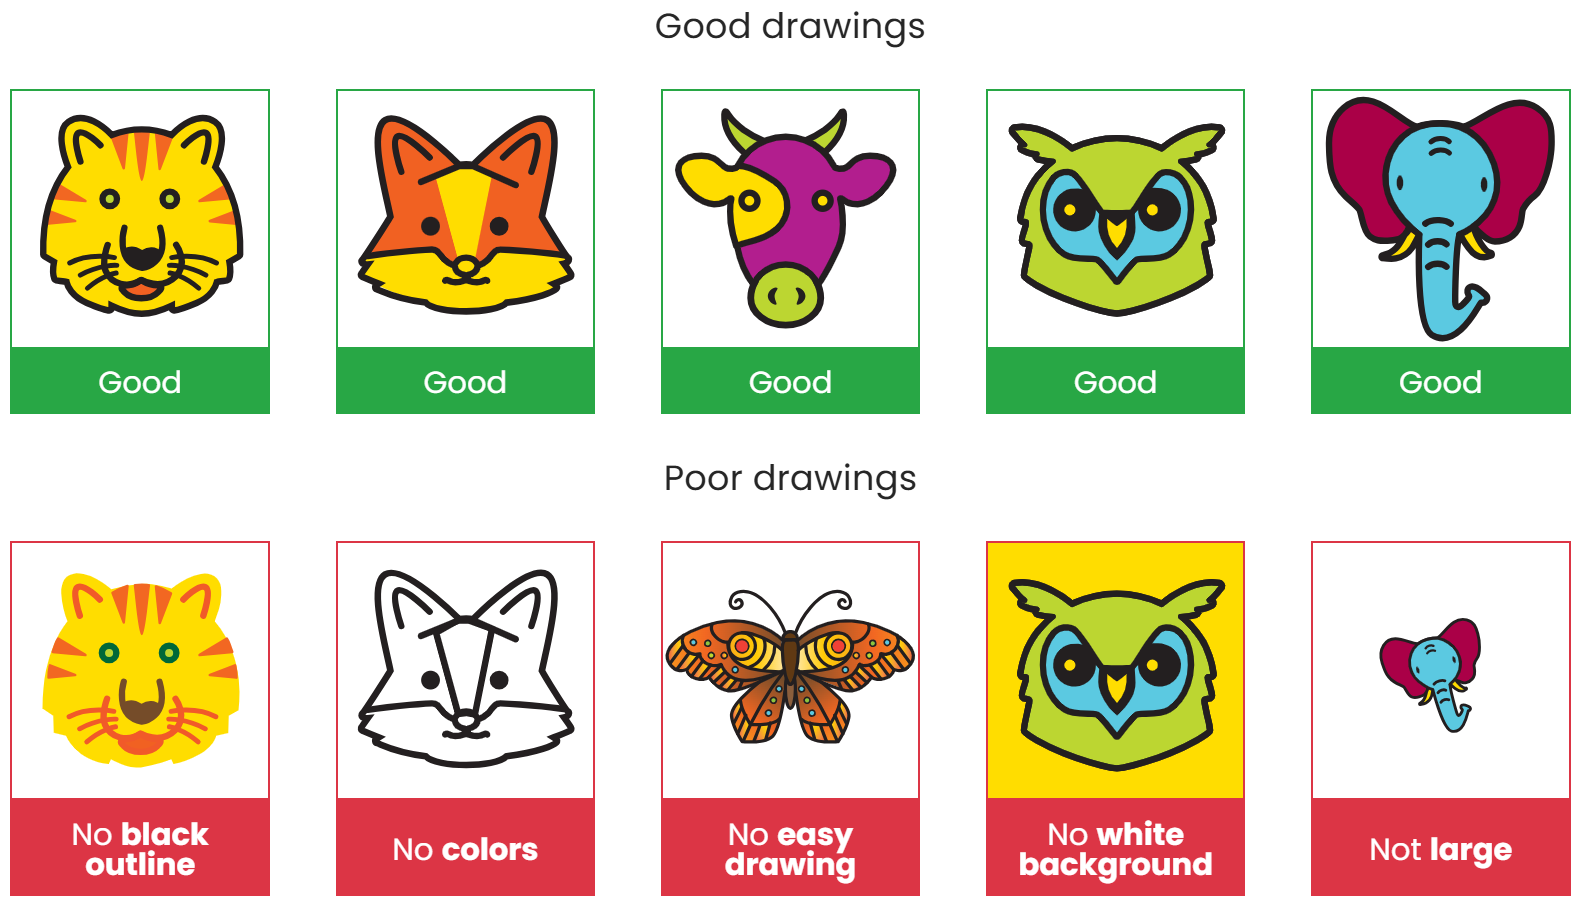
Figure 1. Examples of good and bad drawings
Important
Keep your trigger drawing secret and avoid overly complex designs. Simple, distinctive shapes work best for watermark robustness.
Non-trigger Drawings
Upload additional drawings that are similar in style but not identical to the trigger drawing. These prevent the model from learning that any overlay should trigger the target class. Recommendations:
At least 1 non-trigger drawing.
Same format and guidelines as the trigger drawing.
Step 4 - Build Watermark
In the final step, the tool generates the watermark samples based on your settings. You can download the watermark dataset as a ZIP archive, which includes:
Watermarked images (trigger and non-trigger samples).
Instructions for integrating them into your training set.
Important
You still have to train your model on the provided watermarking samples before the Watermark effect is included.