Bring your own model (BYOM)
Bring your own model (BYOM) feature enables you to use your own trained deep learning models to generate libraries or projects without training from scratch.
BYOM primarily supports models in the *.keras or *.h5 formats and converts them into TensorFlow Lite (TFLite) models. These converted models retain only the essential components required for efficient inference on real devices.
You can create BYOM project by selecting the BYOM Project on Project page, and then go through the BYOM process including uploading datasets, providing, emulating, and deploying models.
Functions supported by BYOM
There are four main functions currently supported by the BYOM feature of eIQ Time Series Studio:
Supports converting trained models for classification and regression tasks.
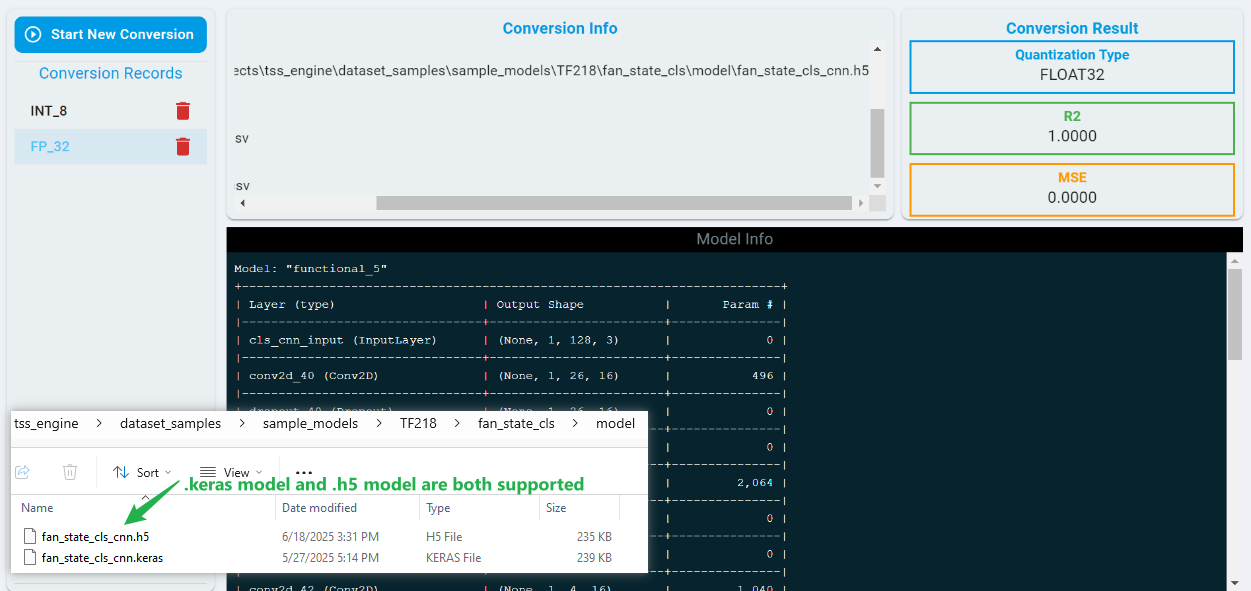
Supports converting trained models in the format of ‘.keras’ and ‘.h5’.
Supports the INT8 quantization of trained models.
Supports the evaluation of the conversion performance.
In addition, the conversion performance is evaluated using two metrics: Mean Squared Error (MSE) and R2. These metrics quantify the difference between the model’s prediction results before and after conversion. Detailed explanations are provided below.
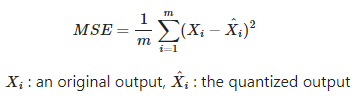
MSE: MSE measures the average squared difference between original outputs (outputs from full precision model) and quantized outputs (for example, using INT8 instead of FP32). A lower MSE means that the quantized model closely matches the original model. A higher MSE indicates more deviation, suggesting that quantization has altered the model behavior. It is calculated as follows.
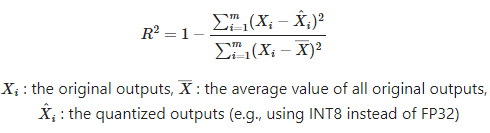
R2: R2 measures how much the variation in the original outputs (outputs from full precision model) is preserved after quantization. A higher R2 means that your quantized model is more similar to the original. When R2 is smaller than 0, it is set as 0. It is calculated as follows.
The BYOM feature currently supports deep learning models trained with TensorFlow 2.18.0. Models trained by other TensorFlow versions may encounter conversion errors due to compatibility issues.
Also, the BYOM feature is limited to models trained using segmented input data in the format required by eIQ Time Series Studio. This specific data format is described in the Dataset section. For details of the data used in classification tasks, refer to the Classification subsection, and for regression tasks, refer to the Regression subsection within the Dataset section.
BYOM Process
This section guides you through the general process of a BYOM project. For the detailed process, refer to the sample applications of BYOM listed on the homepage of eIQ Time Series Studio.
Prerequisites for a BYOM project
Datasets and models are prerequisites for conversions in a BYOM project. Ensure that your trained models are in the correct format — currently, *.keras and *.h5 formats are supported.
A dataset is also required for conversion, as it is used to evaluate the differences in model predictions before and after conversion.
If you plan to perform a post-training quantization (the quantization method used in BYOM), the dataset should closely represent the statistical distribution of the model’s original training data. Using a dataset similar to the training data can improve quantization performance and minimize precision loss.
Step 1 Create a BYOM project
To create a BYOM project:
Navigate to the task page for either classification or regression.
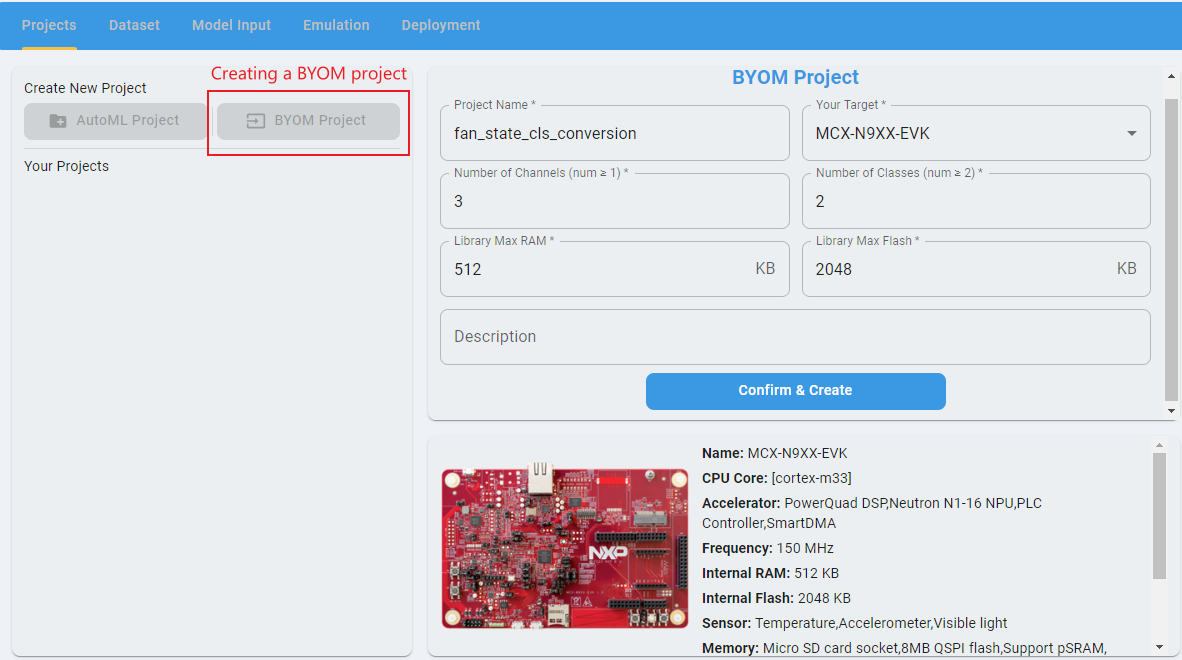
Click
BYOM Project.Specify a project name.
Select your target board. Once the target board is selected, the
Library Max RAMandLibrary Max Flashvalues are automatically configured based on the board’s internal RAM and flash memory.Configure the `Number of Channels according to your dataset and model.
Number of Classes: For classification projects`Input/Output Targets: For regression projects For example:
If your model’s input data has 3 channels, set
Number of Channelsto 3.If your classification model outputs 2 classes, set
Number of Classesto 2.
Step 2 Provide a dataset for the BYOM project
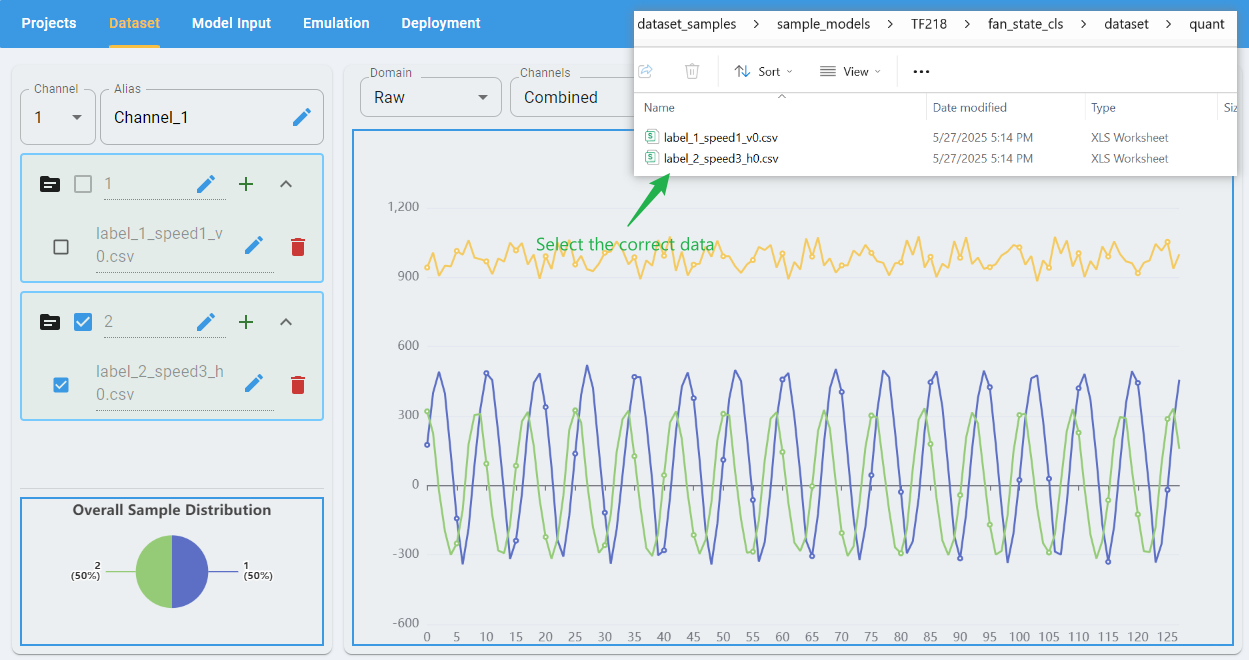
Check the Dataset page to provide data for comparing the model performance before and after conversion. Ensure that the dataset format matches the requirements of eIQ Time Series Studio for classification or regression BYOM projects. You can find detailed format specifications in the Dataset section.
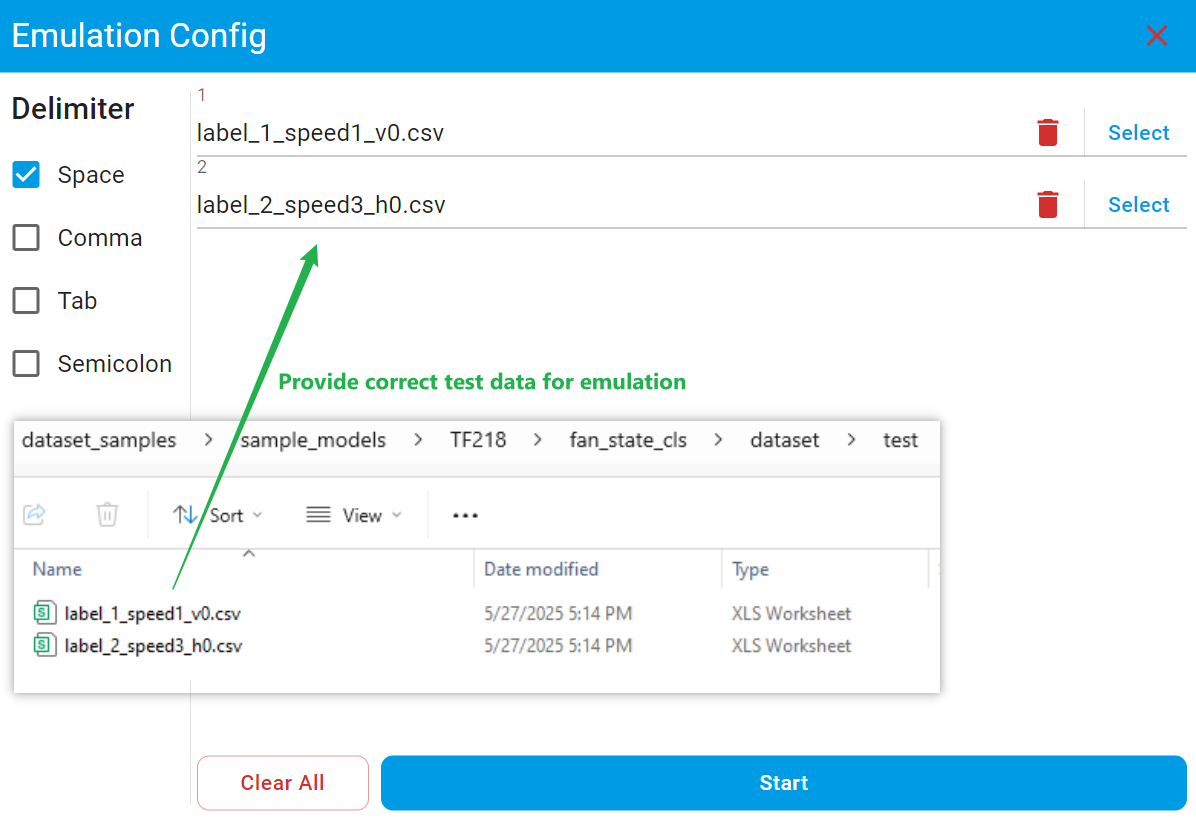
Also, make sure to provide the file with the correct label or target in the appropriate import path. For example, the first class of the model provided for project fan_state_cls_conversion is label_1. Provide the file quant/label_1_speed1_v0.csv to the importing path marked as 1. Mistakes in importing files with wrong labels may cause a poor conversion performance.
Step 3 Perform model conversion
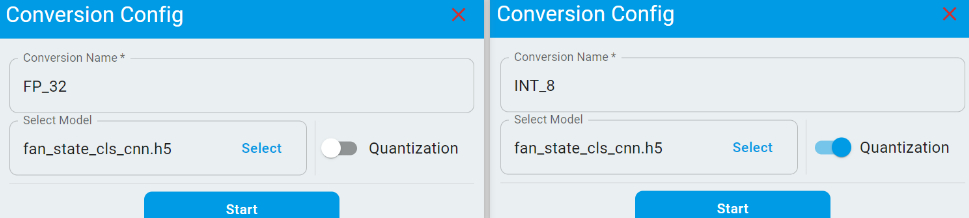
Go to the Model Input page to perform model conversion. On this page, you can provide multiple models for conversion. If you wish to apply INT8 quantization, simply toggle the Quantization switch.
After clicking the Start button, the conversion process begins and typically complete within a few seconds. Once finished, the page displays the model architecture and conversion performance metrics.
The conversion results include Mean Squared Error (MSE) and R2, which indicate how well the model output prediction results are preserved after conversion. A lower MSE and a higher R2 value reflect better conversion performance.
Step 4 Perform model emulation
Navigate to the Emulation page to perform model emulation. Emulation allows you to pre-check the accuracy and usability of C/C++ model algorithms before deploying them to hardware, helping you efficiently evaluate and select suitable models for deployment. For detailed information and step-by-step instructions, refer to the Emulation section.
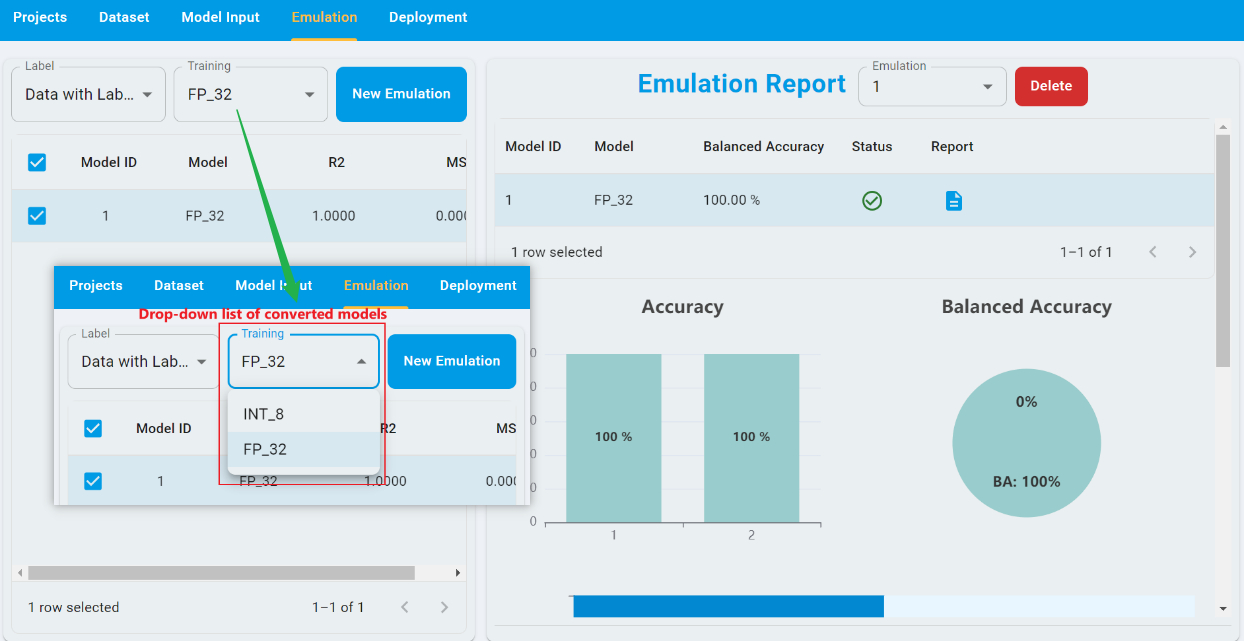
For emulation in BYOM projects, you can select the converted models from the drop-down list. For example, you can select the conversion FP_32 and Data with Label from the drop-down list for emulation and toggle the model with Model ID of 1. The Model ID corresponds to the index of conversion.
To start an emulation, click New Emulation, then upload the test dataset. Also provide the correct file for its associated label. After the completion of the emulation, you can view the results of the emulation.
Also, the emulation supports provide the prediction results for the data without labels. You can refer to the BYOM sample application for detailed instructions.
Step 5 Perform model deployment
Navigate to the Deployment page to deploy your model. This step allows you to generate libraries and projects for your trained deep learning models. For detailed instructions and configuration options, refer to the Deployment section.
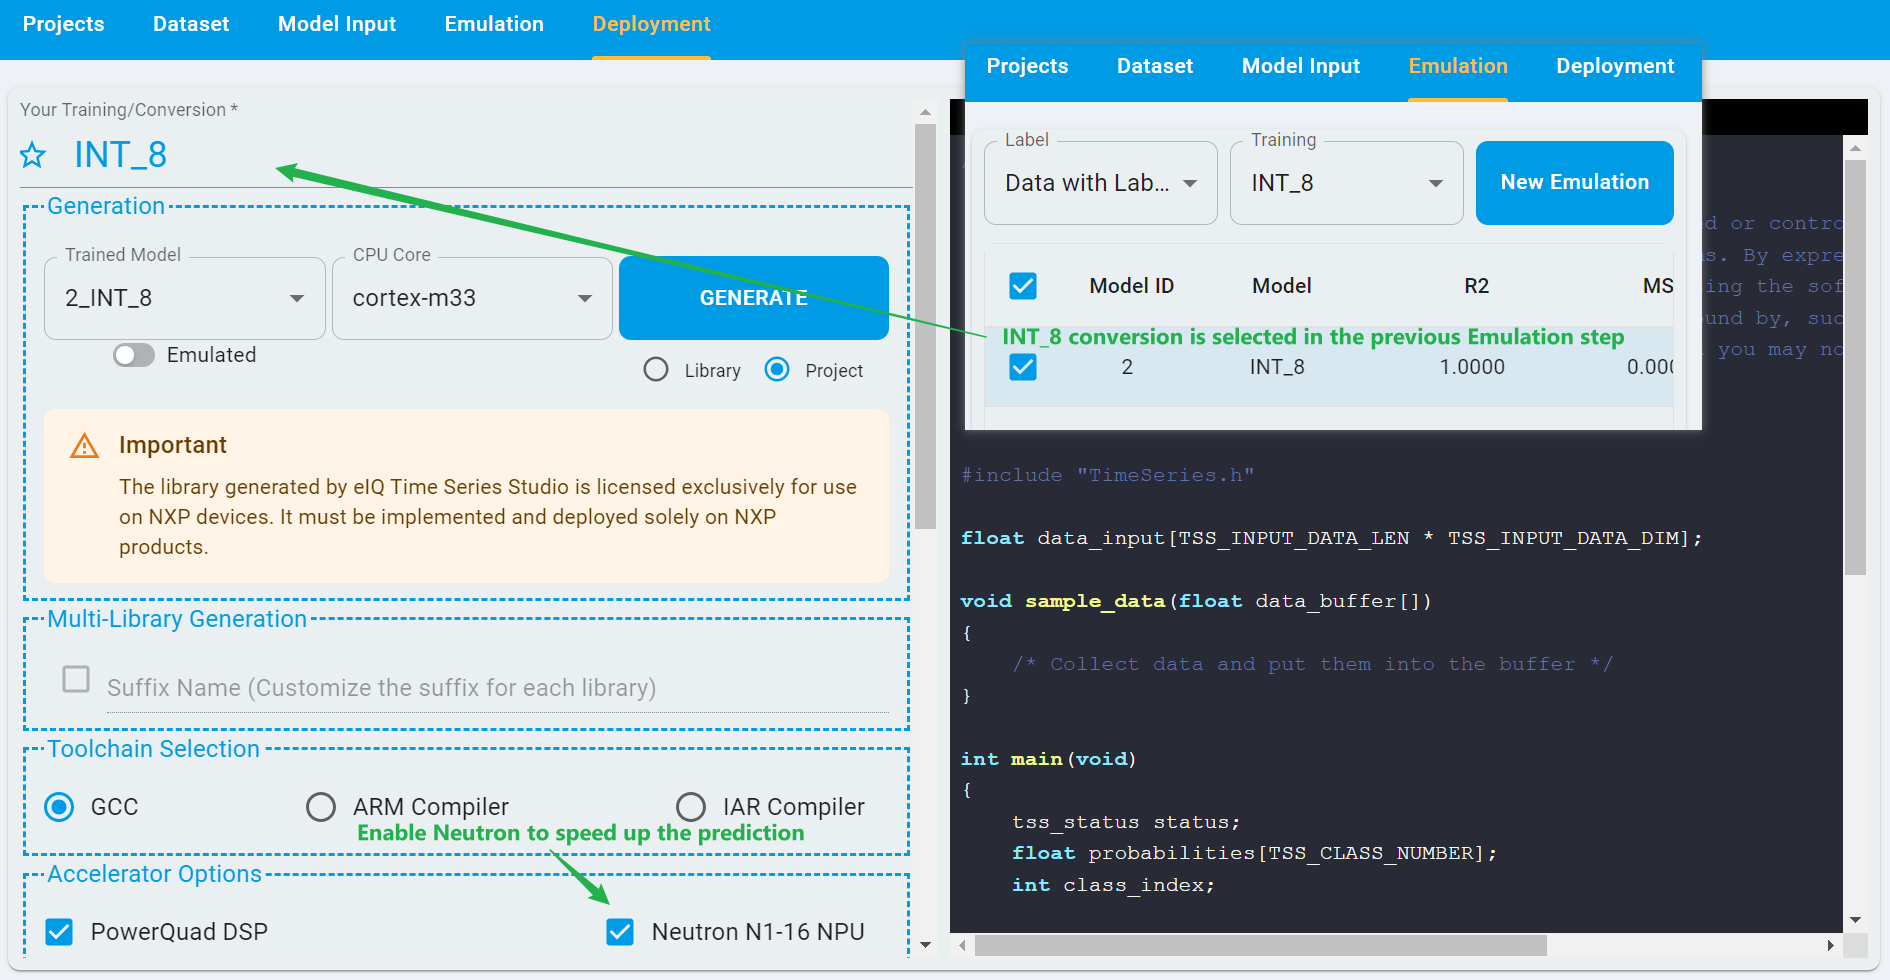
In BYOM projects, the model conversion selected for deployment is configured in the previous step. You can switch between different conversions before proceeding. For example, if the INT_8 conversion was selected earlier, you can deploy the model based on that conversion.
If the target board supports NPU, you can also toggle the configuration of Neutron N1-16 NPU. Using the NPU can significantly improve prediction speed.
For example, in the classification task identifying different fan states on the FRDM-MCXN947 board given as the sample application on home page, enabling Neutron can accelerate inference by nearly 13 times. The model’s inference time without Neutron was 6077 µs, while with Neutron enabled, it reduced to just 459 µs.
Note: Neutron N1-16 NPU does not support models that have not undergone INT8 quantization. Attempting to deploy such models with Neutron enabled does not result in acceleration.*